容器初始化过程
web.xml配置文件
1
2
3
4
5
6
7
8
9
10
11
12
13
14
15
16
17
18
19
20
21
22
23
24
25
26
27
28
29
30
31
32
33
34
35
36
37
38
39
40
41
42
43
44
45
46
47
48
49
50
51
52
53
54
55
56
57
58
59
60
61
62
63
| <?xml version="1.0" encoding="UTF-8"?>
<web-app xmlns="http://xmlns.jcp.org/xml/ns/javaee"
xmlns:xsi="http://www.w3.org/2001/XMLSchema-instance"
xsi:schemaLocation="http://xmlns.jcp.org/xml/ns/javaee http://xmlns.jcp.org/xml/ns/javaee/web-app_4_0.xsd"
version="4.0">
<display-name>ssmdemo</display-name>
<context-param>
<param-name>contextConfigLocation</param-name>
<param-value>/WEB-INF/spring/spring-context.xml</param-value>
</context-param>
<listener>
<description>启动spring容器</description>
<listener-class>org.springframework.web.context.ContextLoaderListener</listener-class>
</listener>
<listener>
<listener-class>org.apache.logging.log4j.web.Log4jServletContextListener</listener-class>
</listener>
<filter>
<filter-name>encodingFilter</filter-name>
<filter-class>org.springframework.web.filter.CharacterEncodingFilter</filter-class>
<init-param>
<param-name>encoding</param-name>
<param-value>UTF-8</param-value>
</init-param>
<init-param>
<param-name>forceEncoding</param-name>
<param-value>true</param-value>
</init-param>
</filter>
<filter-mapping>
<filter-name>encodingFilter</filter-name>
<url-pattern>/*</url-pattern>
</filter-mapping>
<servlet>
<servlet-name>spring-mvc</servlet-name>
<servlet-class>org.springframework.web.servlet.DispatcherServlet</servlet-class>
<init-param>
<param-name>contextConfigLocation</param-name>
<param-value>/WEB-INF/spring/spring-mvc.xml</param-value>
</init-param>
<load-on-startup>1</load-on-startup>
</servlet>
<servlet-mapping>
<servlet-name>spring-mvc</servlet-name>
<url-pattern>/</url-pattern>
</servlet-mapping>
</web-app>
|
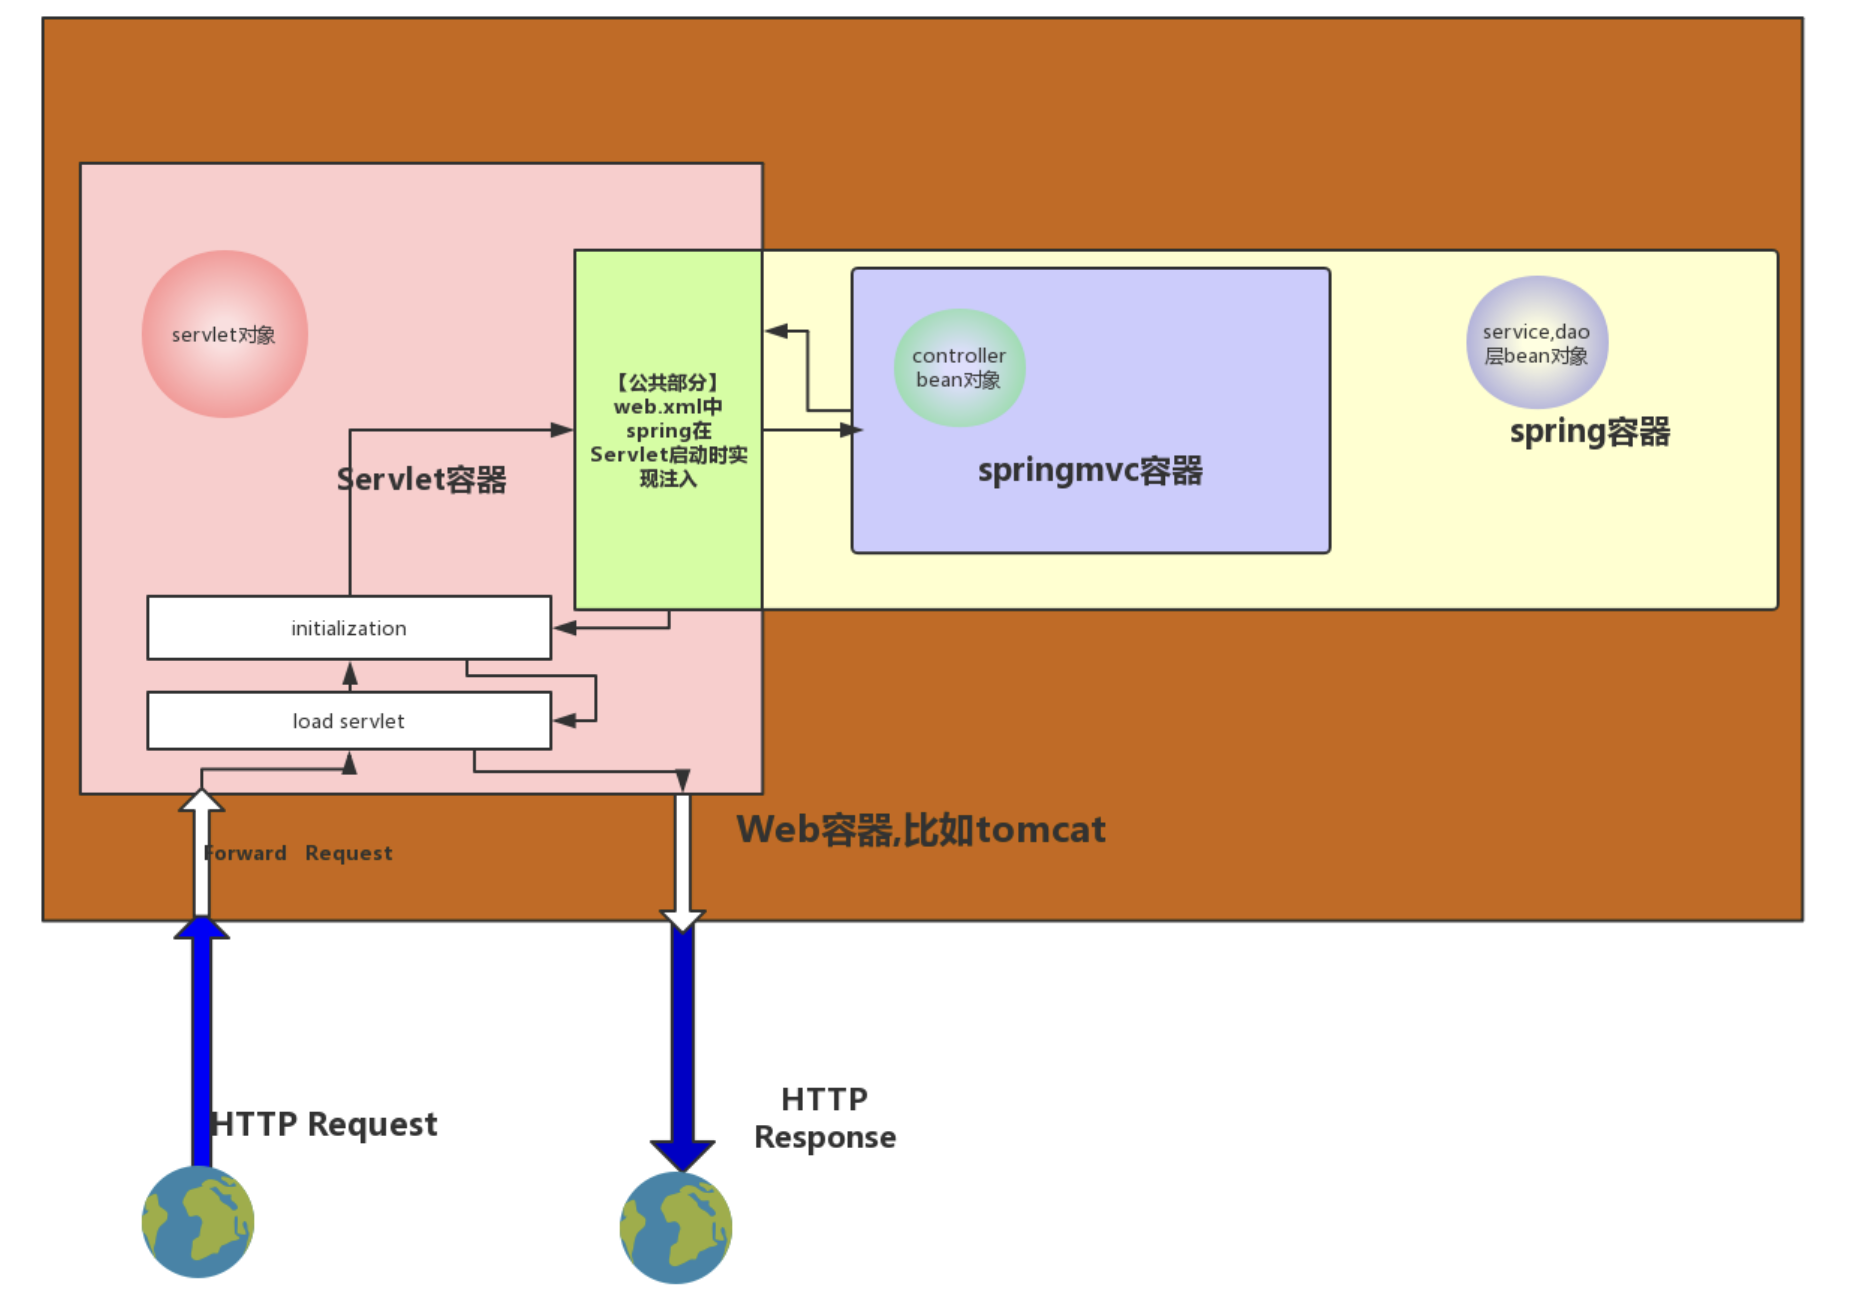
初始化过程
1⃣️ Tomcat读取server.xml配置文件,加载里面配置的Web应用,为每个应用创建一个全局上下文环境ServletContext(ApplicationContextFacade);
2⃣️ Tomcat读取web.xml配置文件,开始按顺序加载(context-param、listener、filter、servlet);
3⃣️ 获取context-param节点信息,保存到ServletContext中(值为Spring配置文件的位置);
4⃣️ 获取listener节点信息,创建Listener实例集合(开始监听),其中的ContextLoaderListener监听器就是用来完成Spring容器初始化的:
ContextLoaderListener监听触发,完成Spring容器(XmlWebApplicationContext)的初始化;
创建Spring容器,通过ServletContext.getinitialParameter(“contextConfigLoaction”)从ServletContext中获取Spring配置文件的位置;
读取Spring配置文件信息,将相关Bean加载到Spring容器中。
Spring容器加载完成,将容器保存到ServletContext中;
Spring容器对象以org.springframework.web.context.WebApplicationContext.ROOT为key的key-value形式存入到
ServletContext.context.attributes属性中。
6⃣️ 获取filter节点信息,创建Filter实例集合,保存到ServletContext中;
7⃣️ 获取servlet节点信息,创建Servlet实例集合,其中的DispatcherServlet就是用来完成SpringMVC容器(XmlWebApplicationContext)初始化的:
根据servlet节点中的servlet-class创建相应的Servlet;
其中DispatcherServlet的初始过程,进行SpringMVC容器初始化;
读取该servlet节点中的SpringMVC配置文件信息,将相关Bean加载到SpringMVC容器中;
设置Spring容器为SpringMVC容器的父容器。
当执行SpringMVC容器的getBean方法在自己的context中找不到对应的bean,则会在父容器Spring容器的context中找对应的bean。
SpringMVC容器初始化完成,将容器保存到ServletContext中。
SpringMVC容器对象以org.springframework.web.servlet.FrameworkServlet.CONTEXT.xxx(其中xxx为servlet-name节点的值)为key的key-value形式存入到ServletContext.context.attributes属性中。
✅ 至此,SSM项目启动完成。
简单概括初始化过程
- Web服务器启动
- 加载Web应用
- 创建ServletContext
- 创建Listener,完成Spring容器初始化
- 创建Filter
- 创建Servlet,完成SpringMVC容器初始化
关于Filter、Servlet等无法自动注入Bean
Listener、Filter、Servlet无法使用@Autowired自动装配bean。
并不是因为他们初始化的时候bean还没初始化。而是因为Listener、Filter、Servlet是Web容器管理的,而bean是Spring容器或SpringMVC容器管理的。Web容器根部就不认识@Autowired注解,当然不可能注入成功。
示意图