MNIST数据集的下载与数据处理

源码(python)

1
2
3
4
5
6
7
8
9
10
11
12
13
14
15
16
17
18
19
20
21
22
23
24
25
26
27
28
29
30
31
32
33
34
35
36
37
38
39
40
41
42
43
44
45
46
47
48
49
50
51
52
53
54
55
56
57
58
59
60
61
62
63
64
65
66
67
68
69
70
71
72
73
74
75
76
77
78
79
80
81
82
83
84
85
86
87
88
89
90
91
92
93
94
95
96
97
98
99
100
101
102
103
104
105
106
107
108
109
110
111
112
113
114
115
116
117
118
119
120
121
122
123
124
125
126
127
128
# coding: utf-8
try:
import urllib.request
except ImportError:
raise ImportError('You should use Python 3.x')
import os.path
import gzip
import pickle
import os
import numpy as np


url_base = 'http://yann.lecun.com/exdb/mnist/'
key_file = {
'train_img':'train-images-idx3-ubyte.gz',
'train_label':'train-labels-idx1-ubyte.gz',
'test_img':'t10k-images-idx3-ubyte.gz',
'test_label':'t10k-labels-idx1-ubyte.gz'
}

dataset_dir = os.path.dirname(os.path.abspath(__file__))
save_file = dataset_dir + "/mnist.pkl"

train_num = 60000
test_num = 10000
img_dim = (1, 28, 28)
img_size = 784


def _download(file_name):
file_path = dataset_dir + "/" + file_name

if os.path.exists(file_path):
return

print("Downloading " + file_name + " ... ")
urllib.request.urlretrieve(url_base + file_name, file_path)
print("Done")

def download_mnist():
for v in key_file.values():
_download(v)

def _load_label(file_name):
file_path = dataset_dir + "/" + file_name

print("Converting " + file_name + " to NumPy Array ...")
with gzip.open(file_path, 'rb') as f:
labels = np.frombuffer(f.read(), np.uint8, offset=8)
print("Done")

return labels

def _load_img(file_name):
file_path = dataset_dir + "/" + file_name

print("Converting " + file_name + " to NumPy Array ...")
with gzip.open(file_path, 'rb') as f:
data = np.frombuffer(f.read(), np.uint8, offset=16)
data = data.reshape(-1, img_size)
print("Done")

return data

def _convert_numpy():
dataset = {}
dataset['train_img'] = _load_img(key_file['train_img'])
dataset['train_label'] = _load_label(key_file['train_label'])
dataset['test_img'] = _load_img(key_file['test_img'])
dataset['test_label'] = _load_label(key_file['test_label'])

return dataset

def init_mnist():
download_mnist()
dataset = _convert_numpy()
print("Creating pickle file ...")
with open(save_file, 'wb') as f:
pickle.dump(dataset, f, -1)
print("Done!")

def _change_one_hot_label(X):
T = np.zeros((X.size, 10))
for idx, row in enumerate(T):
row[X[idx]] = 1

return T


def load_mnist(normalize=True, flatten=True, one_hot_label=False):
"""读入MNIST数据集

Parameters
----------
normalize : 将图像的像素值正规化为0.0~1.0
one_hot_label :
one_hot_label为True的情况下,标签作为one-hot数组返回
one-hot数组是指[0,0,1,0,0,0,0,0,0,0]这样的数组
flatten : 是否将图像展开为一维数组

Returns
-------
(训练图像, 训练标签), (测试图像, 测试标签)
"""
if not os.path.exists(save_file):
init_mnist()

with open(save_file, 'rb') as f:
dataset = pickle.load(f)

if normalize:
for key in ('train_img', 'test_img'):
dataset[key] = dataset[key].astype(np.float32)
dataset[key] /= 255.0

if one_hot_label:
dataset['train_label'] = _change_one_hot_label(dataset['train_label'])
dataset['test_label'] = _change_one_hot_label(dataset['test_label'])

if not flatten:
for key in ('train_img', 'test_img'):
dataset[key] = dataset[key].reshape(-1, 1, 28, 28)

return (dataset['train_img'], dataset['train_label']), (dataset['test_img'], dataset['test_label'])


if __name__ == '__main__':
init_mnist()

load_mnist函数讲解

1
2
3
4
5
6
7
8
9
10
11
12
13
14
15
16
17
18
19
20
21
22
23
24
25
26
27
28
29
30
31
32
33
34
35
def load_mnist(normalize=True, flatten=True, one_hot_label=False):
"""读入MNIST数据集

Parameters
----------
normalize : 将图像的像素值正规化为0.0~1.0
one_hot_label :
one_hot_label为True的情况下,标签作为one-hot数组返回
one-hot数组是指[0,0,1,0,0,0,0,0,0,0]这样的数组
flatten : 是否将图像展开为一维数组

Returns
-------
(训练图像, 训练标签), (测试图像, 测试标签)
"""
if not os.path.exists(save_file):
init_mnist()

with open(save_file, 'rb') as f:
dataset = pickle.load(f)

if normalize:
for key in ('train_img', 'test_img'):
dataset[key] = dataset[key].astype(np.float32)
dataset[key] /= 255.0

if one_hot_label:
dataset['train_label'] = _change_one_hot_label(dataset['train_label'])
dataset['test_label'] = _change_one_hot_label(dataset['test_label'])

if not flatten:
for key in ('train_img', 'test_img'):
dataset[key] = dataset[key].reshape(-1, 1, 28, 28)

return (dataset['train_img'], dataset['train_label']), (dataset['test_img'], dataset['test_label'])

load_mnist函数以“(训练图像,训练标签),(测试图像,测试标签)”的形式返回读入的MNIST数据。

此外,还可以像load_mnist(normalize=True,flatten=True,one_hot_label=False)这样,设置3个参数。

  • 第1个参数normalize设置是否将输入图像正规化为0.0-1.0的值。如果将该参数设置为 False,则输入图像的像素会保持原来的0-255。
  • 第2个参数 flatten设置是否展开输入图像(变成一维数组)。如果将该参数设置为 False,则输入图像为1×28×28的三维数组;若设置为True,则输入图像会保存为由784个元素构成的一维数组。
  • 第3个参数one_hot_label设置是否将标签保存为one-hot表示(one-hot representation)。one-hot表示是仅正确解标签为1,其余皆为0的数组,就像[0,0,1,0,0,0,0,0,0,0]这样。当one_hot_label为Fase时,只是像7、2这样简单保存正确解标签;当 one_hot_label为True时,标签则保存为one-hot表示。

PS:想获取完整的手写数字识别源码请访问我的GitHub:
https://github.com/NUISTGY/Codes-of-fish-book.git


行人重识别代码实战(三)

代码描述

代码来源: https://github.com/layumi/Person_reID_baseline_pytorch

详细信息可见README.md

准备好了训练数据和网络结构,下面就可以训练了:

1
2
3
4
5
6
7
python train.py --gpu_ids 0 --name ft_ResNet50 --train_all --batchsize 32  --data_dir your_data_path
--gpu_ids which gpu to run.
--name the name of the model.
--data_dir the path of the training data.
--train_all using all images to train.
--batchsize batch size.
--erasing_p random erasing probability.

这里探究一下train.py中都做了些什么。
首先是读取数据和label。这里使用了torch.utils.data.DataLoader, 可以获得两个迭代器dataloaders['train'] and dataloaders['val'] 来读数据:

1
2
3
4
5
6
7
8
9
10
image_datasets = {}
image_datasets['train'] = datasets.ImageFolder(os.path.join(data_dir, 'train'),
data_transforms['train'])
image_datasets['val'] = datasets.ImageFolder(os.path.join(data_dir, 'val'),
data_transforms['val'])

dataloaders = {x: torch.utils.data.DataLoader(image_datasets[x], batch_size=opt.batchsize,
shuffle=True, num_workers=8) # 8 workers may work faster
for x in ['train', 'val']}
dataset_sizes = {x: len(image_datasets[x]) for x in ['train', 'val']}

以下则是主要的代码来训练模型,一共只有20行:

1
2
3
4
5
6
7
8
9
10
11
12
13
14
15
16
17
18
19
20
21
22
23
24
25
26
27
28
# Iterate over data.
for data in dataloaders[phase]:
# get a batch of inputs
inputs, labels = data
now_batch_size,c,h,w = inputs.shape
if now_batch_size<opt.batchsize: # skip the last batch
continue
# print(inputs.shape)
# wrap them in Variable, if gpu is used, we transform the data to cuda.
if use_gpu:
inputs = Variable(inputs.cuda())
labels = Variable(labels.cuda())
else:
inputs, labels = Variable(inputs), Variable(labels)

# zero the parameter gradients
optimizer.zero_grad()

#-------- forward --------
outputs = model(inputs)
_, preds = torch.max(outputs.data, 1)
loss = criterion(outputs, labels)

#-------- backward + optimize --------
# only if in training phase
if phase == 'train':
loss.backward()
optimizer.step()

每十轮,都会保存网络和更新loss曲线:

1
2
3
if epoch%10 == 9:
save_network(model, epoch)
draw_curve(epoch)

更多细节见train.py


行人重识别代码实战(二)

代码描述

代码来源: https://github.com/layumi/Person_reID_baseline_pytorch

详细信息可见README.md

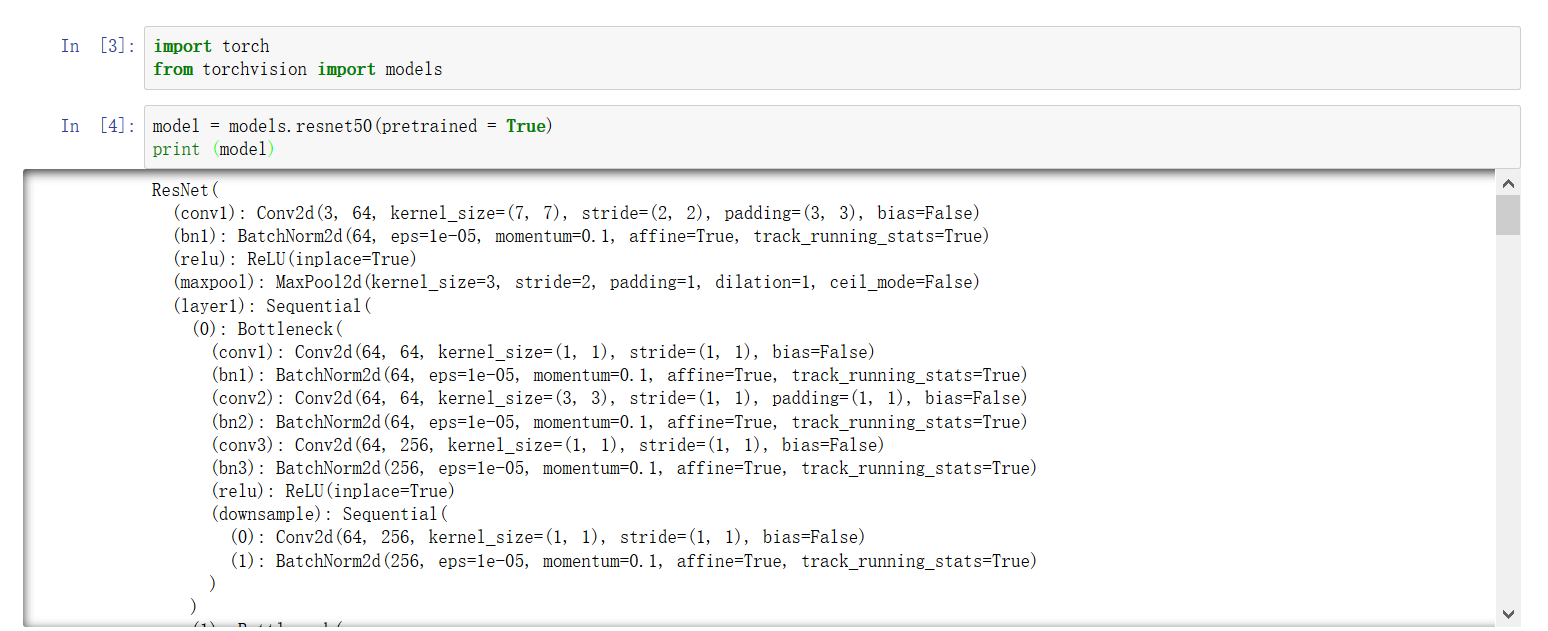
这次研究的是model.py原理是利用和修改预训练模型,代码原作者使用的是ImageNet预训练网络。

pytorch里引入方式如下:

1
2
from torchvision import models
model =models.resnet50(pretrained = True)

通过print(model)查看网络结构:

实际使用时要做修改。考虑到Market1501训练集中有751个不同的人,所以要改变模型来训练Reid的分类器:

1
2
3
4
5
6
7
8
9
10
11
12
13
14
15
16
17
18
19
20
21
22
23
24
25
26
27
# Define the ResNet50-based Model
class ft_net(nn.Module):

def __init__(self, class_num, droprate=0.5, stride=2):
super(ft_net, self).__init__()
model_ft = models.resnet50(pretrained=True)
# avg pooling to global pooling
if stride == 1:
model_ft.layer4[0].downsample[0].stride = (1,1)
model_ft.layer4[0].conv2.stride = (1,1)
model_ft.avgpool = nn.AdaptiveAvgPool2d((1,1))
self.model = model_ft
self.classifier = ClassBlock(2048, class_num, droprate)

def forward(self, x):
x = self.model.conv1(x)
x = self.model.bn1(x)
x = self.model.relu(x)
x = self.model.maxpool(x)
x = self.model.layer1(x)
x = self.model.layer2(x)
x = self.model.layer3(x)
x = self.model.layer4(x)
x = self.model.avgpool(x)
x = x.view(x.size(0), x.size(1))
x = self.classifier(x)
return x

更多细节在model.py中,里面还包含了其他的预训练模型以及对应的修改方法。